Git
Git is a version control tool like CVS, Subversion and Mercurial. We often reference this family of tools as Version Control System (VCS) or Source Control Management (SCM). A version control keep tracks of modifications to one or multiple files over time so that you can later access a specific version. Here are a few example: a software developer want to keep tracks of the evolution of his code; a DevOps engineer want to trigger tests on published changes and deploy new releases from well defined access points of the software history; a web developer need to store every version of an image or a layout; an Infrastructure Engineer want to store and keep track of his deployments procedures and changes of configuration; a Data Scientist want to logs all his experiments and features evolutions. At Adaltas, the installation procedure of the Arch Linux systems used on the majority of our laptops is stored and shared on a public repository.
Version control is everywhere, it is your best friend. It is not a imposed burden, it provides you efficiency, confidence and confort. Git is the most popular version control tool. We help you understand what Git is and the basic concept of how it works with steps by steps instructions.
Getting up and running
The 3 most popular Git hosting platforms are:
- Github: free public repository hosting, up to 5 private repository
- Gitlab: open source, install your own git server anywhere, free public / private hosting
- Bitbucket: free public / private repository hosting
The GitHub platform was selected for this tutorial. Thus, you must first create an account unless you already have one at your disposal.
The terminal or a graphical user interface (GUI) is used to manage a Git repository. You can refer to the official Git GUI tools page to choose one of your liking. We recommand installing GitHub Desktop Linux and Fork on Windows and macOS. Alternatively, you can use the native git command line tool to achieve the same results.
This is a list of popular and recommanded Git clients:
- Fork (Mac/Win)
- GitG (Linux)
- GitHub Desktop (Mac/Win/Linux)
- SourceTree (Mac/Win/Linux)
- Your terminal!
Finally, you must have at your disposal and IDE suitable for code editing. The popular Visual Studio Code is used for this turial. Atom and Sublime Text are also excellent choices. All of them run on Linux, MacOS and Windows. Notepad and Microsoft word are not suitable. Don’t even try.
Objectives
You can follow those instructions alone or in a small group of 2 or 3 persons. Some instructions ask to create concurrent modification. At least 2 computers must be available. If you are alone, you can simulate having 2 computers by having the same repository on two different location, thus creating two different folders. During the course of this tutorial, you will
- Do the Github Desktop tutorial
- Create a repository and clone it on your computer
- Create a branch and navigate between branches
- Publish your modifications and retrieve your collegues modifications
- Manage conflicts
1. Do the Github Desktop tutorial
If you are new to Git, we recommand the usage of Github Desktop. It runs on every systems and it is the one used below for the screnshots. If you are on Windows or macOS, Fork offers by far the best experience.
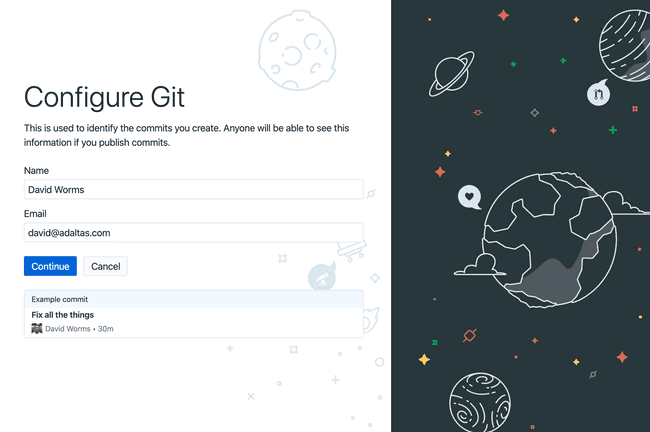
Upon its installation, start Github Desktop and click the “Sign in to GitHub.com” button. You are redirected to the GitHub webpage to authorize the application to sign in on your behalf. Once authorized, your must enter two screens to configure Git and to obtain your agreement to share telemetry information.
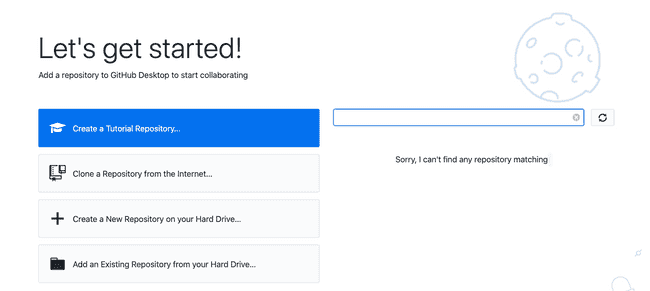
Once ready, run the tutorial by clicking “Create a Tutorial Repository” and follow the instructions.
2. Create a repository and clone it on your computer
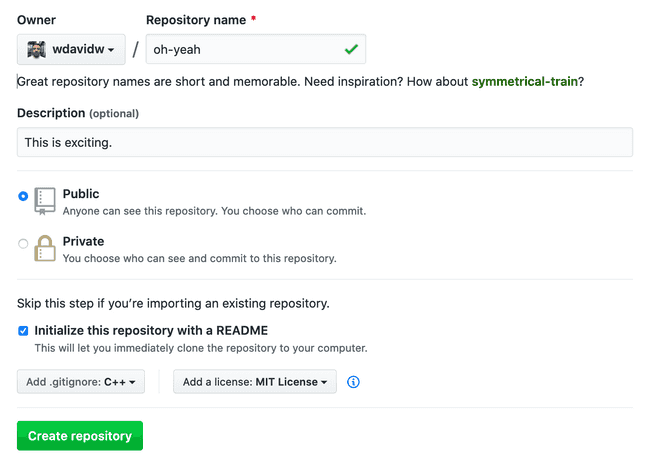
Only one member of a group must create the repository. If you are alone, create it as well. Repositories are created from the GitHub website:
- Got to GitHub and make sure you are signed in.
- Navigate to the page “Your repositories”
- Click on “new”
- Choose an awesome name
- Check the box “Initialize this repository with a README”
- Select the “.gitignore” which best fit your targeted language
- Complete the remaining fields including the project description and license.
- Navigate into your repotority and go into “Settings → Manage Access”
- Click on “Invite a collaborator” and add the other members of your group (unless your are alone)
[[info | About the “.gitignore”]]
| The “.gitignore” is an hidden file which indicate which files to ingore the version control. Path are expressed using a globbing expression. The expression “.*” marks every hidden file present inside your repository to be excluded. Paths starting with ! are marked as commited even if a rule exclude them. One or multiple files may be created, usually one is present inside your repository root directory. An example for a Node.js project ignoring the “node_module” directory storing your dependencies as well as every hidden except the Travis configuration file would look like:
|
| | .*
| /node_modules
| !/.travis.yml
| !/.gitignore
|
Every collaborator can now clone your repositories and publish changes. Let’s import a copy of the new repository on your computer. This action is called “clone” in Git terminology. Every member can now:
- Open Github Desktop
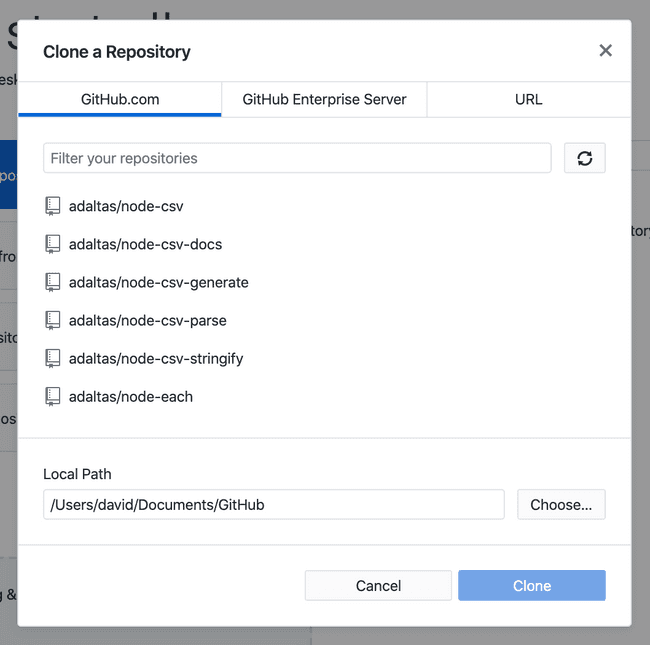
- Click on “Clone a repository from the Internet”
- From the “GitHub.com” tab, select your repository name
- Finish by clicking the “Clone” button.
A copy of your repository is now available locally on your machine. If your are following these guidelines alone, repeat the operation by cloning once again the same repository but at a different location.
3. Create a branch and navigate between branches
A branch is a lightweight movable pointer to one commit. From there new commits can be created which diverge with the commit made in the original branch.
One of the team member creates a branch:
- Open Github Desktop
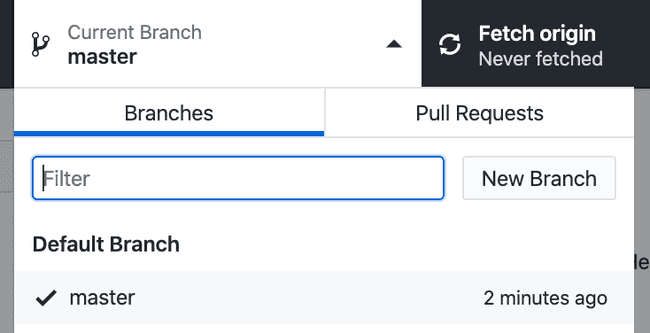
- Go to “Current branch → New branch”
- Enter the branch name “develop” and click “Create branch”
You can now navigate between branches, in your case “master” which is the original branch and “develop” which is newly created. In Git, switching into a branch is called “checkout”.
4. Publish your modifications and retrieve your collegues modifications
The same team member modifies the “README” file and publishes the “develop” branch with its changes.
First we modify the “README” file:
- Start your favorite IDE, for exemple Visual Studio Code
- Open your repository folder by going to “Open” and selecting the targeted folder.
- Modify and save the “README” file
Then we save the changes, this is called “commit” in Git:
- Open Github Desktop
- Select the files you wish to commit, you can even select a part of a file
- Enter a commit message in “Summary”
- Validate by pressing “Commit to develop”
Finally, we now share our changes by synchronising our local change with the remote repostiry on GitHub, this is called “push” in Git
- Select “Publish branch” to push your changes
Other team member can now import our changes from GitHub, this is called “pull” in git:
- Select “Fetch origin” to synchronise your local repository with the remote changes
- Switch to the “develop” branch
- Select the “History” tab to view the lastest commits
- Open your favorite IDE
- Browse through your project folder, open the “README” file, you shall see the latest changes
5. Manage conflicts
A conflict occurs when a part of a file has been modified on two branches which are merged. Those branches can inside a same repository instance under two different names, for example if we wished to import the changes present in engine into master. They can also be the same branch name but between two different instances, such as between your local repository and the remote one hosted on GitHub.
We will create a conflict and see how to resolve it. Two team members make incompatible changes inside the develop branche, modifying the same line of the same “README” file :
- Modify the README file
- Commit the changes
- Push the modifications

The second user fails to push the modifications and he encounters an error titled “Newer commits on remote”. Git is not allowed to push modification on a remote server which has commit which we not already imported locally. This behavior ensure Git to never encounter conflicts on the remote server since every potential conflict must first be imported and handled locally first.
The second user push is rejected, he must first pull the commits present on the remote server.
- Click on the “Fetch” button
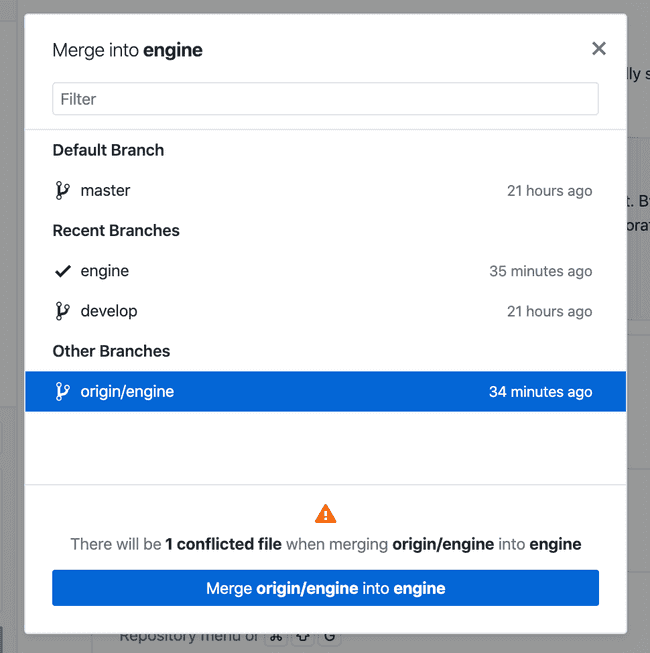
- Merge the remote changes with yours from “Branch -> Merge into current branch”
- Select the “origin/engine” branch
- Click on the button to Open the conflict in your favorite editor
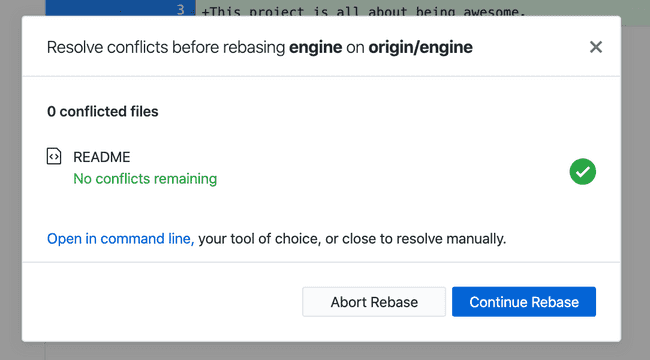
In order to resolve the conflict, you must preserve the HEAD or the part bellow the equal signs. Whatever is of no interest must be removed, including the lines containing ==== and >>>>.
Once all the lines have been cleared out, GitHub Desktop detects the conflicts to be resolved. It proposes you to pursue and merge your changes.
The “History” tab, display the various commit being applied including the remote modification as well as yours.

You can now push your changes remotely and your team can pull them safely.
Next steps
You can now try to follow this tutorial from the command line instead of using GitHub Desktop or another Git GUI. To do so, you must have Git installed on machine. It shall be installed by default on Linux and MacOS. Here are the instructions:
- Linux : https://git-scm.com/download/linux
- MacOS : https://git-scm.com/download/mac
- Windows : https://gitforwindows.org/
You can now open your terminal and start exeecuting Git commands. On Windows, Git BASH is an emulation used to run Git from the command line. It also provide a Linux and UNIX environnement which you might find convenient.
You can also refer to the resources below to learn and remember the various Git commands and functionnalities:
- https://gist.github.com/aquelito/8596717
- https://github.github.com/training-kit/downloads/github-git-cheat-sheet.pdf (available in various language including French)
For a more visual and interactive learning approach, give a try to the following resource:
