HBase project initialization and unit tests
Before implementing an application, it is essential to set up the project properly using the right tools and good practices. This tutorial helps to build a Java project using Apache Maven, how write unit tests with the test-driven development (TDD) methodology and provides appropriate ways to test Apache HBase applications.
To illustrate the usage of Apache Maven and to contextualise the writing of unit tests, we will create a minimalist chat application which insert and retrieve messages into an HBase table.
Installing Maven
Apache Maven is a software project management tool for Java. It allows to manage dependencies and to automate its development (compilation, testing, deliverable production…). Maven is written in Java, so it is necessary to have Java installed (e.g. from Oracle’s download site). Check the installation by using the java -version command which display the right version number:
java -versionOnce Java is installed, depending on your operating system, follow the corresponding instructions.
Ubuntu
Update the package index and install Maven by typing:
sudo apt update
sudo apt install maven
To verify the installation, run:
mvn -versionMac OS
The easiest way to install Maven on Mac OS is to use the package manager Homebrew:
brew install mavenIt is also possible to download the “Binary tar.gz archive” file from the Maven official website and then extract it using the below command:
tar -xvf apache-maven-3.8.1-bin.tar.gzTo verify the installation, run:
mvn -versionWindows
Download the “Binary zip archive” file from the Maven official website and then unzip it in a folder.
To verify the installation, run:
mvn -versionSetting up a IDE for Maven
There are two popular integrated development environments (IDE) for Java: Eclipse and IntelliJ.
Eclipse
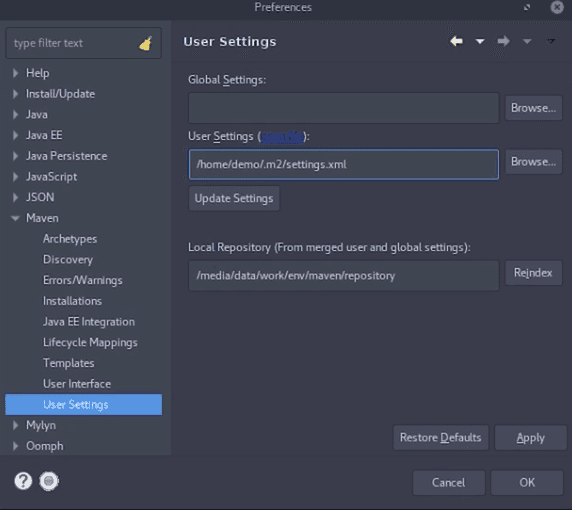
Depending on your operating system (OS), download Eclipse for java EE from the Eclipse official website.
- Run Eclipse
- Open the Preference: Window > Preference
IntelliJ
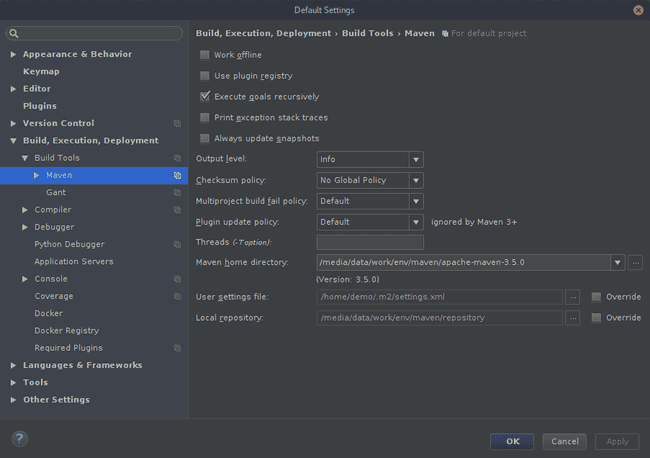
Depending on your operating system (OS), download IntelliJfrom the IntelliJ official website.
- Run IntelliJ
- Open the default preferences: File > Other Settings > Default Settings
Creating and setting a Maven project
Generate a Maven project skeleton
Maven can build a project from different skeleton models (or archetype), here let’s choose the archetype quickstart and name the project my_chat with a groupID called com.adaltas.examples:
mvn archetype:generate -DgroupId=com.adaltas.examples -DartifactId=my_chat -DarchetypeArtifactId=maven-archetype-quickstart -DinteractiveMode=falseThis command creates a directory named my_chat at the current location, which contains a base Maven project. This directory contains:
pom.xml: the Project Object Model contains the information and configuration used to build the project.src\main\java\com\adaltas\examples: contains your application code.src\test\java\com\adaltas\examples: contains tests for your application.
Generate the hbase-site.xml file
The hbase-site.xml file contains configuration for the HBase components, for Kerberos (authentification, Keytab) and Zookeeper (Quorum, Znode). It’s convenient to copy the hbase-site.xml file from the Adaltas cluster to a conf directory in your project location:
cd my_chat
mkdir conf
scp user@edge-1.au.adaltas.cloud:/etc/hbase/conf/hbase-site.xml ./conf/hbase-site.xml
Configure the pom.xml file
Our project uses the HBase client lib. The pom.xml file is the fundamental unit of work in Maven projects, it contains information about the project and configuration details such as the project dependencies.
Inside the pom.xml file, add in the <dependencies> section with your favorite text editor the following dependency that will be needed later to run our tests. For Hortonworks environment let’s add:
<dependency>
    <groupId>org.apache.hbase</groupId>
    <artifactId>hbase-testing-util</artifactId>
    <version>2.0.2.3.1.0.6-1</version>
    <scope>test</scope>
</dependency>
This dependency is located at Hortonworks repository, then add in a
<repositories>
    <repository>
        <id>hortonworks.extrepo</id>
        <name>Hortonworks HDP</name>
        <url>https://repo.hortonworks.com/content/repositories/releases/</url>
    </repository>
</repositories>
For Cloudera environment, the declaration looks similar:
<dependency>
    <groupId>org.apache.hbase</groupId>
    <artifactId>hbase-testing-util</artifactId>
    <version>1.2.0-cdh5.7.0</version>
    <scope>test</scope>
</dependency><repositories>
<repository>
<id>cloudera-repos</id>
<name>Cloudera Repos</name>
<url>https://repository.cloudera.com/artifactory/cloudera-repos/</url>
</repository>
</repositories>Build the library
Running mvn clean package, it builds a library in a form of a jar file named my_chat-1.0-SNAPSHOT.jar inside a target directory, containing the code and all the dependencies required to run it.
Unit testing
test-driven development
The test-driven development (TDD) is a development technique that requires writing tests before writing the code so that the application follows a plan set by the tests. By following this philosophy, we ask ourselves directly what objective the application code should achieve and allow us to code only what is necessary.
mini cluster HBase
To start writing tests we need to have an HBase service up and running. There are several ways to do it:
- A “mini” HBase process embedded inside a Java code.
- A fully deployed HBase cluster over a distributed Big Data architecture.
- A local VM or container based HBase instance or cluster.
The recommended approach is to embed a small footprint HBase instance in the same process as our tests. The HBase instance is created when the tests are executed. It starts fairly quickly and it presents several advantages. Tests are independent of an external process which should be started and operated. No plumbing is required to plug the tests with the database, simplifying the overall developer experience. It also integrates smoothly in a CI/CD workflow. Although it is appropriate for testing functional behaviour it can’t be used to test integration with a real-world cluster with security (SSL, kerberos), or resistance to failure if a node is down, nor to test the distributed nature of the database such as the row key distribution and region splitting.
Start the mini cluster
Let’s assume we want a Java application that inserts data into an HBase table. According to the TDD methodology, the good practice is to firstly write a test checking that the data in the table are those expected after the insertion and after implement the insertion of the data into the HBase table. Start to create a new class HBaseTest in the src/test/java/com/adaltas/examples/ directory by typing:
vim src/test/java/com/adaltas/examples/HBaseTest.javaImplement a first method to start an HBase mini-cluster thanks to the HBaseTestingUtility class, and use it to get an HBaseAdmin instance which allows to perform the tasks of an administrator:
public class HBaseTest {
protected HBaseAdmin admin;
private static HBaseTestingUtility utility;
// The JUnit annotation @Before means that this method will be executed before the test.
@Before
public void setup() throws Exception {
        utility = new HBaseTestingUtility();
        utility.startMiniCluster();
        admin =  utility.getHBaseAdmin();
}
Create an HBase namespace
Namespaces are used for logical table grouping into the HBase system. It used to resource management, security, isolation. For example, a namespace can be created to group tables and to hand out specific permissions (i.e allow a user to only read the data inside a table) to the users.
Create a second method called testInsert and inside instantiate a NamespaceDescriptor object and pass it to the createNamespace method of the admin instance to create a new namespace called my_namespace:
public void testInsert() throws Exception {
     NamespaceDescriptor namespace =  NamespaceDescriptor.create("my_namespace").build();
     admin.createNamespace(namespace);
    }
Create an HBase table within a namespace
To create the table, use the createTable method of the HBaseTestingUtility instance with the table name my_chat and the namespace name created as the first argument, and a column family called messages as the second argument. Get the table created in a Table class object:
Table table = utility.createTable(TableName.valueOf("my_namespace:my_chat"), Bytes.toBytes("messages"));the beginning of the class should look like below:
// The JUnit annotation `@Test` indicates that the method is a test
@Test
public void testInsert() throws Exception {
NamespaceDescriptor namespace =  NamespaceDescriptor.create("my_namespace").build();
admin.createNamespace(namespace);
Table table = utility.createTable(TableName.valueOf("my_namespace:my_chat"), Bytes.toBytes("messages"));
// Insert a message in "my_chat"
        /*...*/
}
Read an HBase table
Let’s leave aside the data insertion part and first read the table. The Get class can be used to read a specific row by its row id. In the schema of our chat aplication the row ids correspond to the name of the author of a message:
Get get = new Get(Bytes.toBytes("Lauren"));Use the get() method of the Table class by passing your get object. This method returns the requested row in a result object:
Result result = table.get(get);Before was the verbose approach, find below the simplest way with chained arguments:
Result result = table.get(new Get(Bytes.toBytes("Lauren")));From the result object it’s possible to access to its row id using result.getRow() or to its value using result.value().
Perform unit tests
assertEquals is a method returning true if its parameters are equal. So it’s convenient for comparing two values in a unit test. In the schema of our chat aplication the values are the message body. Check if the result object has the expected message body (row id) and author name (value) of the insertion:
assertEquals(Bytes.toString(result.getRow()), "Lauren");
assertEquals(Bytes.toString(result.value()), "I'm writing a unit test");
Insert data
After writing our unit tests let’s code the data insertion part. To insert data into an HBase table, the add method and its variants are used. This method belongs to the Put class, then instantiate the Put class by passing the row id you want to insert the data into:
Put put = new Put(Bytes.toBytes("Lauren"));The addColumn method requires as parameters the column family, the column qualifier, and the value to be inserted, respectively. Add “I’m writing a unit test” to the “body” column qualifier of the “messages” column family:
put.addColumn(Bytes.toBytes("messages"), Bytes.toBytes("body"), Bytes.toBytes("I'm writing a unit test"));Save your new row by passing the put instance to the put method of the Table class:
table.put(put);Before was the verbose approach, find below the simplest way with chained arguments:
table.put(new Put(Bytes.toBytes("Lauren")).addColumn(Bytes.toBytes("messages"), Bytes.toBytes("body"), Bytes.toBytes("I'm writing a unit test")));Below find a complete example of our HBaseTest class that creates an HBase table within a namespace using a mini cluster, puts data inside, reads the table and make sure that the value inserted is the expected one:
import org.apache.hadoop.hbase.client.Table;
import java.io.IOException;
import static org.junit.Assert.*;
import static org.junit.Assert.assertEquals;
import org.junit.Test;
import org.apache.hadoop.hbase.client.Put;
import org.apache.hadoop.hbase.HBaseTestingUtility;
import org.apache.hadoop.hbase.client.Get;
import org.apache.hadoop.hbase.client.Result;
import org.apache.hadoop.hbase.util.Bytes;
import org.junit.Before;
import org.apache.hadoop.hbase.TableName;
import org.apache.hadoop.hbase.NamespaceDescriptor;
import org.apache.hadoop.hbase.client.HBaseAdmin;
public class HBaseTest {
protected HBaseAdmin admin;
private static HBaseTestingUtility utility;
// The JUnit annotation @Before means that this method will be executed before the test.
@Before
public void setup() throws Exception {
    utility = new HBaseTestingUtility();
    // Start the HBase mini cluster
    utility.startMiniCluster();
    // Get an `HBaseAdmin` instance to perform tasks of an administrator
    admin =  utility.getHBaseAdmin();
}
// The JUnit annotation `@Test` indicates that the method is a test
@Test
public void testInsert() throws Exception {
    // Create a namespace called "my_namespace"
    NamespaceDescriptor namespace =  NamespaceDescriptor.create("my_namespace").build();
    admin.createNamespace(namespace);
    // Create an HBase table called "my_chat" within the namespace "my_namespace"
    Table table = utility.createTable(TableName.valueOf("my_namespace:my_chat"), Bytes.toBytes("messages"));
    // Insert a row key corresponding to the author's message
    Put put = new Put(Bytes.toBytes("Lauren"));
    // Add "messages" as the column family, "body" as the column and "I'm writing a unit test" as the value
    put.addColumn(Bytes.toBytes("messages"), Bytes.toBytes("body"), Bytes.toBytes("I'm writing a unit test"));
    table.put(put);
    // Read data from the given author's message
    Get get = new Get(Bytes.toBytes("Lauren"));
    Result result = table.get(get);
    // Compare actual value of the table and the expected valued
    assertEquals(Bytes.toString(result.getRow()), "Lauren");
    assertEquals(Bytes.toString(result.value()), "I'm writing a unit test");
    }}
To run the test type mvn test to execute all your tests. If the tests are successful, the output should be:
Results :

Tests run: 1, Failures: 0, Errors: 0, Skipped: 0
If something goes wrong, the output should be something like:
Results :

Failed tests:   testInsert(HBaseTest): expected:<DATA-[1]> but was:<DATA-[2]>

Tests run: 1, Failures: 1, Errors: 0, Skipped: 0
In case we have several tests, it’s handy to filter and run only one test. For example to run only the HBaseTest class:
mvn -Dtest=HBaseTest testConclusion
By integrate unit tests into your HBase project, you apply from the ground up the TDD philosophy where every single feature is tested before implemented. As your application grow, your code remains robust and new features and bug fixes are incorporated with confidence. But this is not only about writing tests. Embedding HBase into your tests greatly improve your productivity and developer experience. Changes in your code are much faster to test when compared with a manual or scripted deployment. Iterating with new database interactions is quick and convenient, whether it is to write new features or just to test HBase behaviors.


